DIY REMOVABLE CHALKBOARD

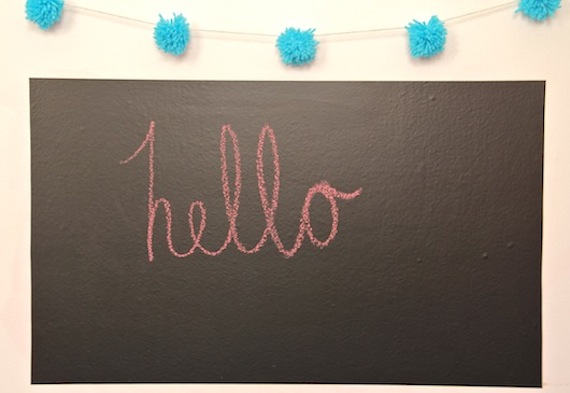
I really wanted a large-ish chalkboard for Elliott's room but we couldn't figure out how we should do it. As renters, we knew that if we painted a chalkboard on the wall or hung a large chalkboard up on the wall, that our landlord might look down on that. After quite a bit of research I discovered chalkboard contact paper! It got great reviews so I thought we should give it a try, and wouldn't you know it, it works great!

All you need is chalkboard contact paper, scissors and a spot on your wall. It goes on so smooth, people will ask if it is painted on. We made ours 3 ft x 2 ft and it seems to be perfect for the space. I was worried that the contact paper would make the writing/drawing a bit spotty as some chalkboard products can be. But I couldn't be happier with it! And when we move, we can just peel it off with no damage to the walls. Pretty perfect, right?
I also made a little pom pom garland to hang above it. I used this tutorial and strung them on some string (like here). After about 2 minutes, Elliott had grabbed it and killed the poor little pom poms. The next one I make will hang a bit higher on the wall :)

Gift Guide: The Sweet, Smart and Hilariously Goofy Kid

How I love this kid.  You know, the kind of kid who is thinking of you and even though he is only six, and 2,000 miles away, borrows his mom's phone to call to let you know he loves you. (Insert melting heart here)

P.S. A little confession: I want the shadow puppets and the books for myself.
scooter, animal erasers, shadow puppet, sweater, pants, shoes, books,

DIY ombre stocking

As promised, here is another DIY stocking. Last week's stocking was mine, but this one is Elliott's. He doesn't know what it is for or the joy it will bring him in 2.5 weeks, but he thinks it's nice.

I won't bore you all with the instructions on how to dye fabric. But to anyone who may not know how to get the ombre effect, all you do is dip the fabric (stocking in this case) into the prepared dye. Then gradually lift your fabric out of the dye giving a few minutes per "layer". Once you've reached the end, you'll have a gradient/ombre/dip-dye stocking! It's very easy and the outcome is simple and subtle, but pretty. If you need more of a reference, check this DIY out. It's pretty much the same thing but with a table cloth :)