ANTI-SLIP SOCKS

DIY Anti-slip socks
DIY Anti-slip socks

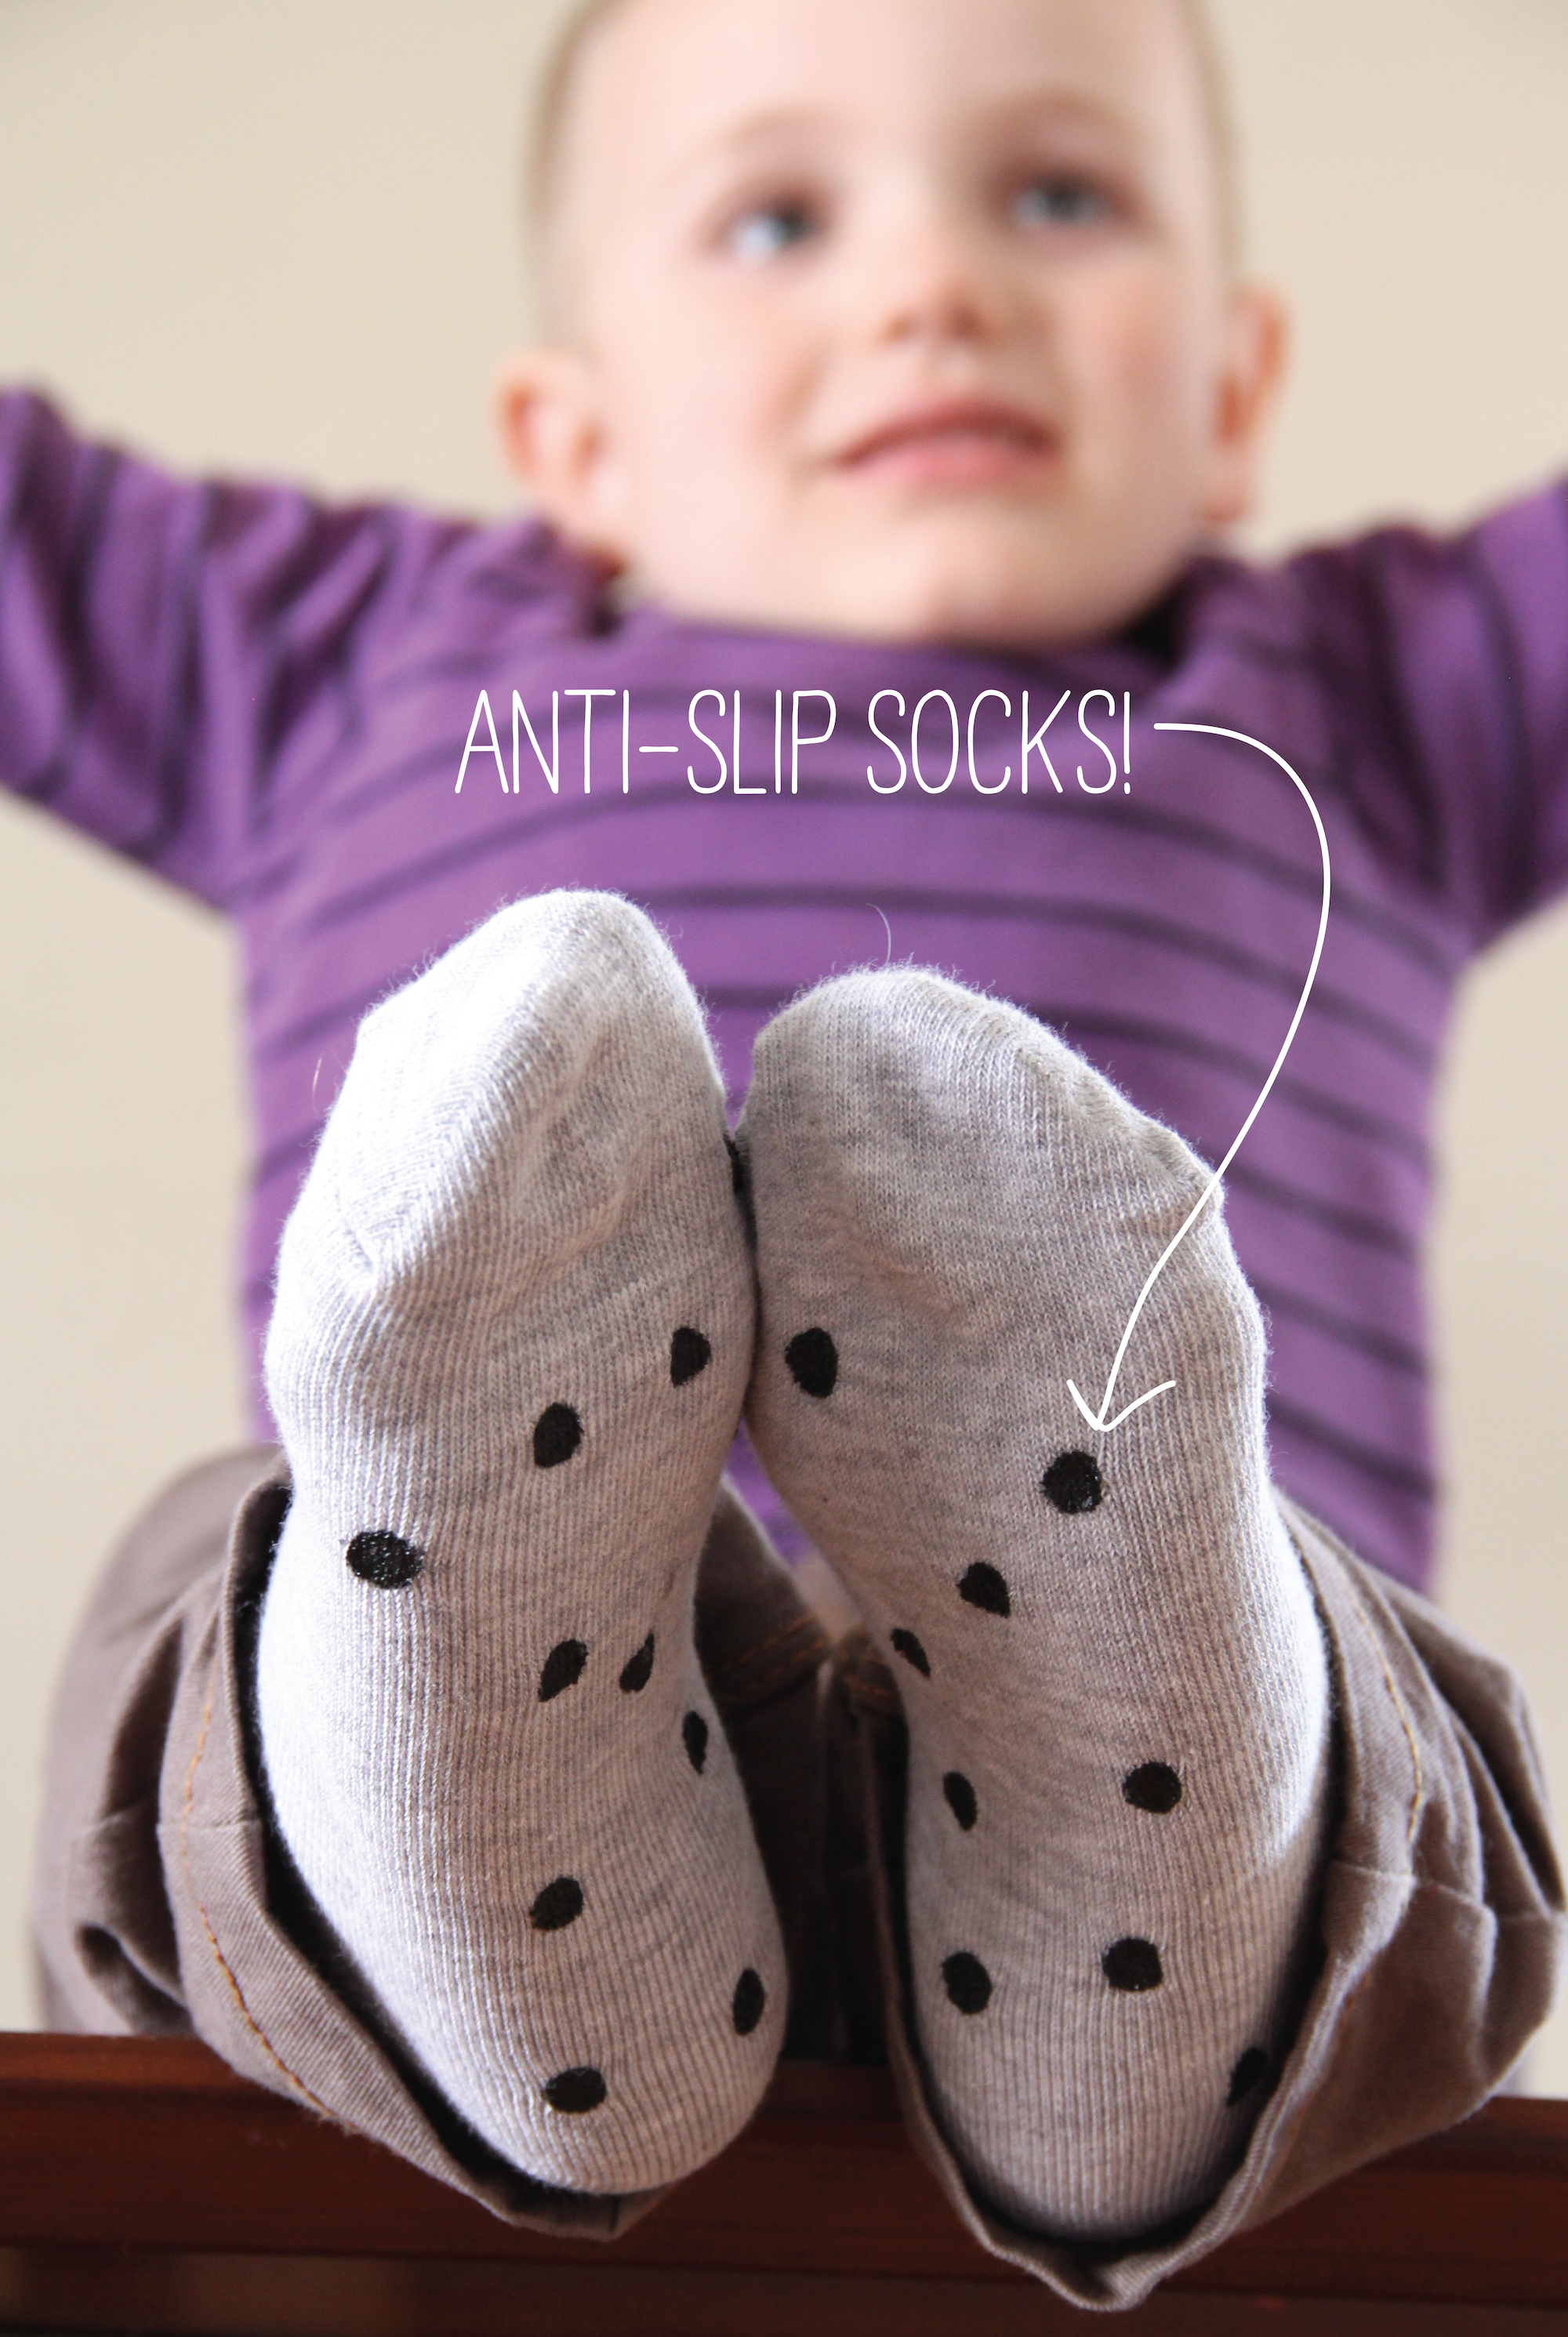
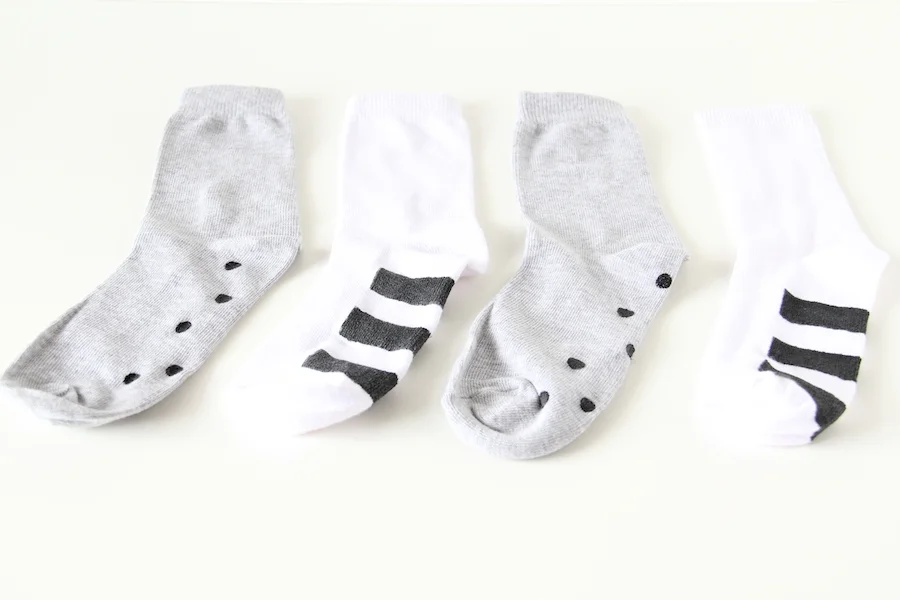
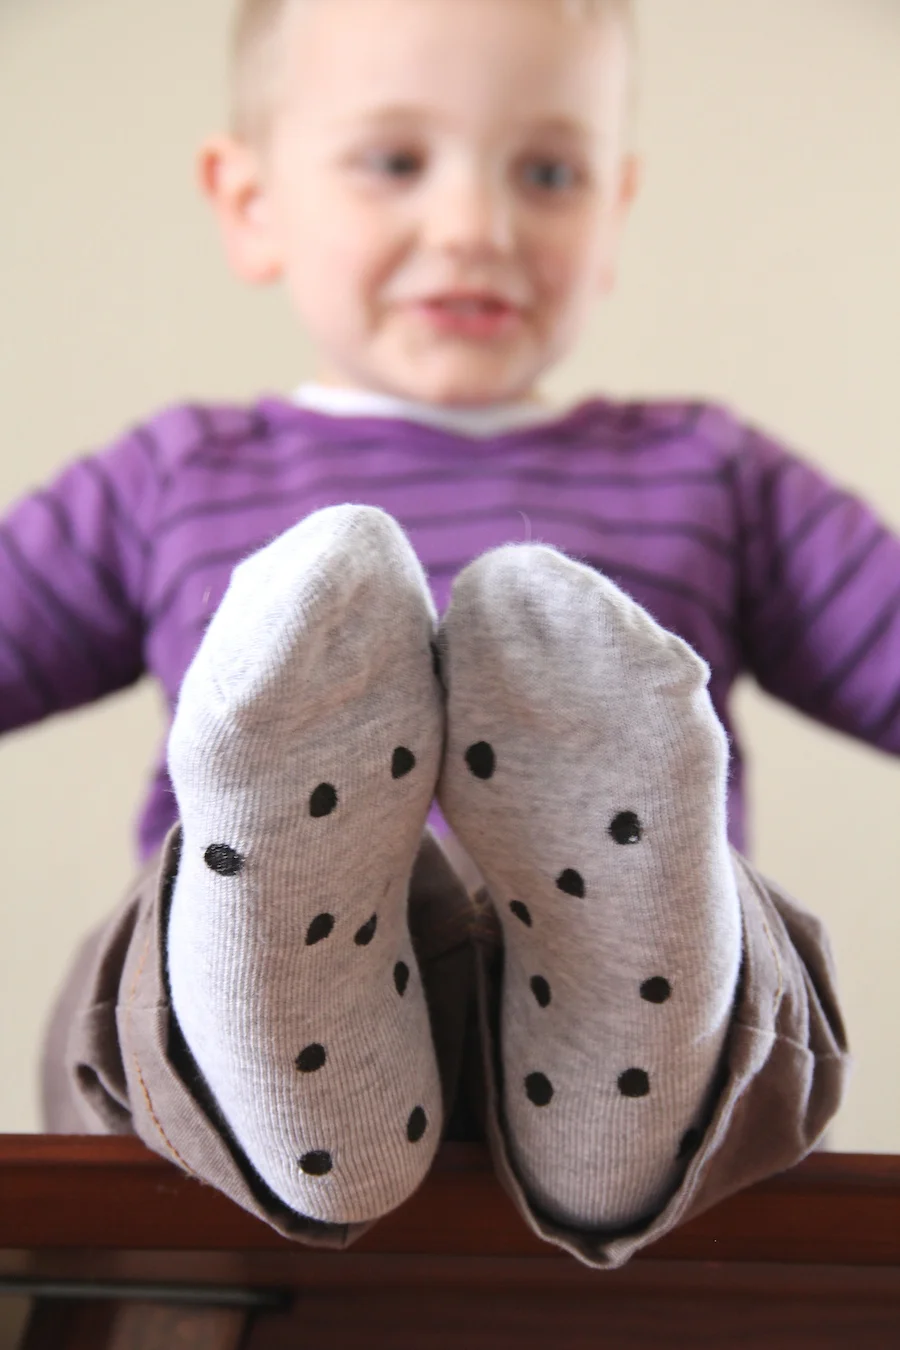
I am pretty sure it's a universal thing that kids slip and slide with socks on hard floors. Just the other day Elliott slipped and hit his head. So I thought I would make some anti-slip socks to help prevent any future head injuries. They are really, really easy to make and you can get creative with the designs you put on the bottom. I am planning on making some more and putting little dashes on the bottom. How are these anti-slip? Well, there's this little product called Plasti dip. It's found at the hardware store for about $6 and is used primarily for adding grip to tools, etc. It's flexible, washable and grippy so I thought it would work great. And wouldn't you know it, it does! They feel just like the grippy socks you buy at the store, but better because you made them! Let's get started, shall we?

DIY anti-slip socks

To make your own you will need:

  • Socks
  • Plasti Dip
  • Pencil with eraser
  • Cardboard
  • Tape
  • Paint brush
Make your own anti-slip socks

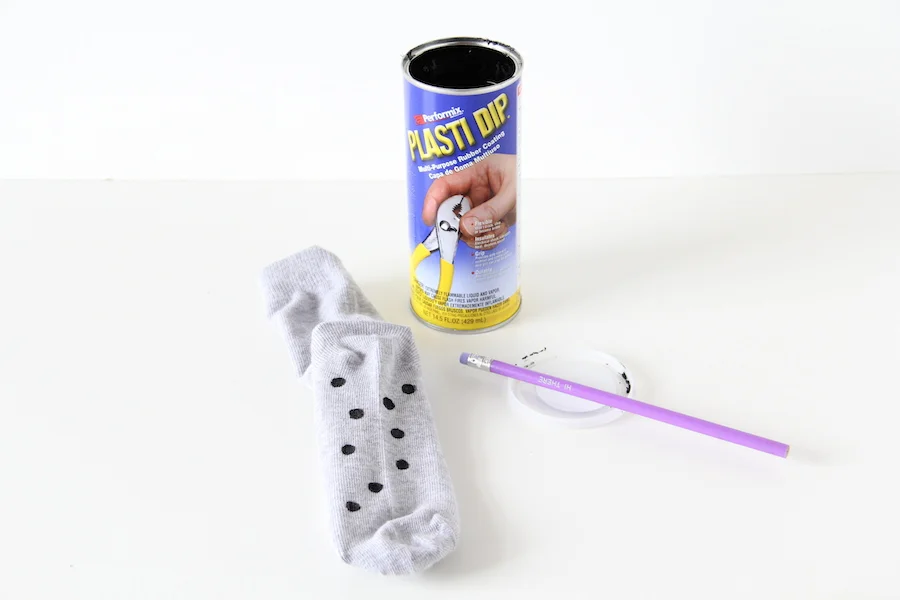
Put a piece of cardboard about the same size as the sock inside the sock to keep the plasti dip from seeping through. To make the polka dot pattern, just dip the pencil eraser into a little bit of the plasti dip and stamp away! You will want to do at least five or six coats, but don't worry. This stuff dries really quickly. It took me a total of three minutes to make one pair. To make the striped grips, use some tape to mark off your stripes and paint the plasti dip on. Again, you will want several coats. Once it's dry, remove the cardboard and tape and you're done!

DIY Anti-skid socks
IMG_6497.JPG

MINI LAYERED CAKES

mini layered cakes 02.png
mini layered cakes 03.png

You remember our Oscars party, right? This year we had our guests each bring a themed appetizer and we provided the desserts. I made these little layered cakes for each of our guests. I had initially envisioned them to be a bit smaller, but it turns out it was the perfect amount of cake for our friends. I made even smaller, single layered cakes for the kids to enjoy, but of course I neglected to get any pictures. Want to make your own? Of course you do! 

The cakes are made by baking the cake batter in a cookie sheet pan and using circle cookie cutters to cut out each layer. I found that if you wait for the cake to cool completely, the circles cut a lot cleaner. I made a vanilla bean buttercream frosting to add between the layers and on top. I wouldn't suggest trying to ice the whole cake if you do the cookie cutter way because the sides were pretty fragile and crumbly. For the cake I just used super moist boxed cake mix. I know, I know, but it is really good and I just didn't have time to make my own. Plus I wanted three flavors of cake and there was no way I was making three cake batters from scratch! Now for the frosting, I made a super easy vanilla bean buttercream that is out of this world good. Basically the recipe is softened butter, powdered sugar, a teensy bit of milk and real vanilla bean. Use the milk and the powdered sugar to get the right consistency you are going for and that's it! Throw it all in the mixer and play around with the amount of powdered sugar till it tastes perfect. Then pipe your heaven sent frosting onto your little cakes and prepare to devour. In the end it was a fun dessert for a special night. These would be a lot of fun to make for a little one's birthday or for a fancy Easter party. Just a thought. 

mini layered cakes 01.png

AROUND HERE

Happy St. Patrick's day! We are having fun celebrating with our green, gold and rainbows today. Normally the leprechaun comes to visit us the night before and leaves a little gift for any little one sleeping in that house. Well, the leprechaun was running behind schedule, so he's really coming tonight. Ha! This weekend was a blast. Preston unexpectedly had a four day weekend, and boy did we take advantage. We explored a new to us park where we had a picnic lunch and fed the ducks oats. Did you know ducks love oats? Apparently bread isn't good for them, so next time you feed them, grab the oats! That night Elliott had the great idea to make homemade pizzas, so make homemade pizzas we did. I had forgotten how fun it was to make your own pizzas. All weekend long there was a kids film festival going on here in Salt Lake City. So of course we had to check that out. It was awesome. We saw Ernest & Celestine which is a french animation that was nominated for an oscar this year and I have to say, I think it deserved to win. The whole film festival, was so much fun! They had free pizza, apple slices and carrots, a photo area to feel like a celebrity and a whole lot of great activities to spark the imagination. It really was fantastic. If you are in the Salt Lake City area, you have to make sure to go next year. We'll see you there! 

GIANT SHAMROCK GARLAND + TIC TAC TOE

Giant shamrock garland
St. Patrick's day tic tac toe

We've got a two for one for you today, folks! I made two fun projects for the little ones (and let's be honest, you can get in on this action too) to enjoy for St. Patrick's day. First up! A giant shamrock garland. Why giant you ask? Because everything is better if it is either giant or mini. This is a really easy and fast DIY you can make with the kids. Elliott loved helping me paint the shamrocks! Seeing his work hung up in our house really made his day. You can see more details over here on Momtastic. And for the second DIY! Some St. Patty's day themed tic tac toe. Who doesn't love tic tac toe? To make it holiday themed, just make the pieces a shamrock and a gold coin and you can play again and again with the same paper and pieces! We have been playing this a lot lately and I have to admit I am surprised by how little I have won. To make your own, head over to Momtastic to see the details. St. Patrick's day is on Monday, so you still have time to make these and have some fun with them before we start in on Easter! 

ST. PATRICK'S DAY TREAT BAGS

It wouldn't be St. Patrick's day without some gold coins, right? I made some simple festive stickers to seal some treat bags for Elliott and his cousins. If you would like to make your own you can download the stickers, print them off onto sticker sheets and hole punch them to seal any bags of gold and goodies you might have for your little ones. Or! You can just make the stickers to let your kids wear on St. Patty's day. You can download the stickers right here. My hole punch is 1.25 inch so the shamrocks and rainbows are sized to fit that size. I left a little space so you could use a slightly larger hole punch too! No matter what size you make them or what you use them for, I hope you have fun with them!